
Sunday, February 12, 2012
Blocking Your Finished Item

Lately I've been making lots & lots of flowers. While I want to try this pattern in wool & felt it, I first made it in a wool blend -- just because I like the colors. I'm glad I did. It's pretty, but it's a mess.It is crying out to be blocked.
+-+Copy.jpg) |
| Pattern is #3 on this page. |
To block an item, you need pins & a piece of styrofoam:
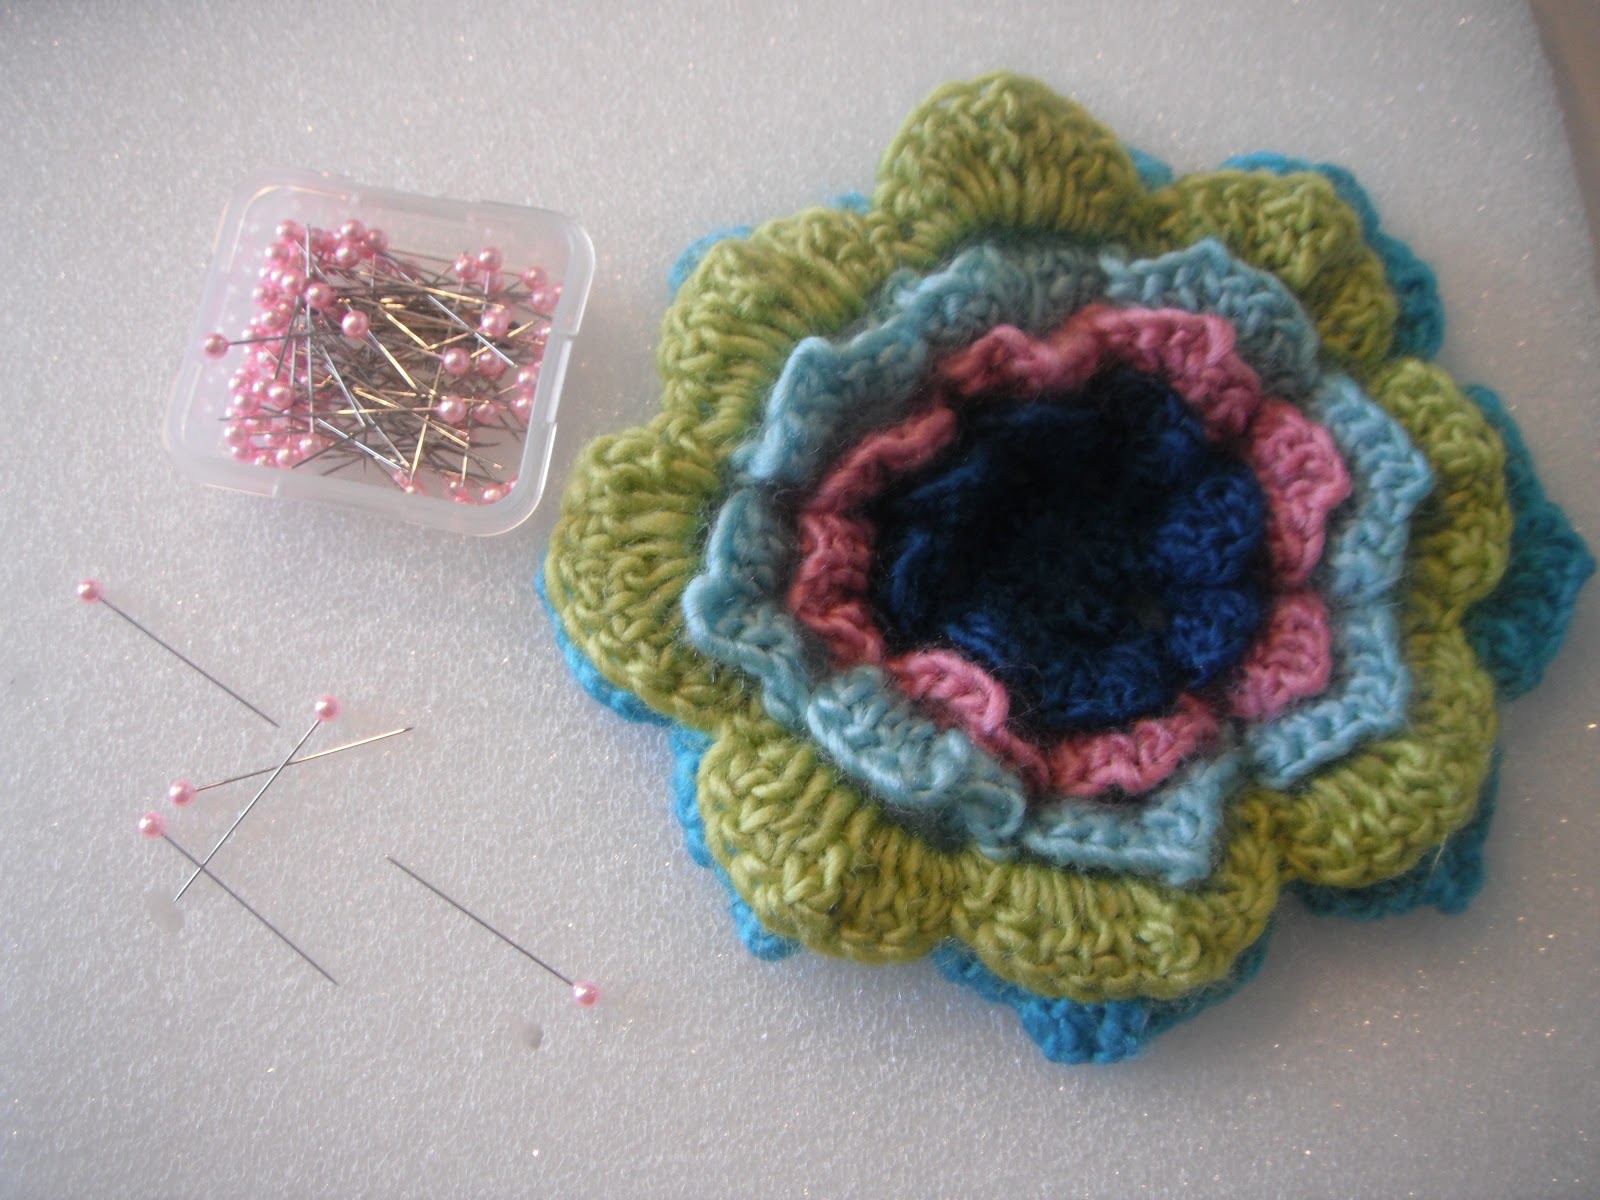
Make sure your item is wet. I washed mine & rolled it up in a clean towel to get out most of the moisture. Then pin the item to the styrofoam making sure to pull it into the shape you want.

Use lots of pins & make sure the item is exactly how you want it. For this flower, I pinned each petal down so it came to a point. Now walk away & let it dry.
A couple days later, and I have this:
Lovely! And ready to be sewn onto....something. I don't know what yet. Maybe a pillow or maybe I'll use it as a highlight on a round purse. I have no idea. I just wanted to make it.
I think I'll go make another.


Reading a Crochet Pattern
 |
| This is what we'll be making. I should add that this is my own, untested pattern, inspired by all the flowers I've been making lately. If you find any mistakes, please let me know. |
Materials:
Small amounts of yarn in black & red
Hook sized for yarn used (check your yarn label for the recommended hook size)
stitch marker (optional, but we'll be crocheting in the round, so this is a good way to mark the first stitch)
blunt needle (to weave in the ends)
This is just a list of what you will need to complete the project. The pattern will tell you exactly the type of yarn used to complete the finished project as seen. If you don't wish to use the yarn specified, you can substitute a different yarn. In order to ensure you buy enough yarn, I like to look up the yarn used (Google comes in handy here!) and calculate how many yards were used to complete the project. When I buy the yarn I want, I now have an idea of how much to buy. If you're unsure what yarn to substitute, bring the pattern to your local yarn store (LYS) for advice. You can also google "yarn substitutions" for ideas.
For this project, you just need small amounts of the colors used, so it's a great stash buster. For the flower pictured, I used 100% wool in red and black because I plan on felting the flower.
Next, most patterns will list abbreviations used when writing the pattern. This is helpful so that you know how to read the pattern & it also tells you what stitches you'll need to know in order to complete the pattern. If you see a stitch you don't know, search for it on YouTube. YouTube is a great resource to learn a new stitch as you get to watch someone make it and you can bookmark the video & refer to it when needed. For this pattern, we will be using the following abbreviations:
Abbreviations:
ch = chain
hdc = half double crochet
RD = round
sc = single crochet
ss = slip stitch
st = stitch
tc = treble crochet
If there is a need, some patterns will list notes before the instructions. What you might find here are the special stitches you will be working or anything the author feels you should know before beginning the pattern. For my pattern, I have listed the following instructions:
Notes: You will need to know how to work a magic
circle to use this pattern. I used worsted weight 100% wool (#4) and an “H” hook for flower about 3.25” before
felting.
If you don't know how to start with a magic circle, you can chain 3 and slip stitch to form a loop. You can then work the stitches from Round 1 (below) into the loop. I do recommend looking up "magic loop" on YouTube and learning how to do this. Once you learn the magic loop, you will never want to chain to form a loop. The magic loop is so much easier and it allows you to completely close the center, so there is no hole. With that said, if you're making a pattern that needs a hole in the center, do not use the magic loop (or don't close your loop the entire way.)
If there is any information on gauge you will see this information before the instructions. This flower doesn't have a gauge because the size will be determined by the type of yarn & size of hook used. However, if you see a pattern that does recommend a gauge swatch, please take the time to work the swatch. This is when you will see if you need to make any changes to the hook size or tension you're using to crochet. The last thing you want to do is complete a pattern and find out it's the wrong size. Been there, bought the t-shirt. Now I ALWAYS make a gauge swatch before starting any new pattern or if I'll be working a familiar pattern with a different kind of yarn. It really doesn't take long and it's soooo worth it!
Next come the instructions. Since this post is intended to help someone learn to read a pattern, I thought it would be best to post the instructions & then break them down. I did not take pictures of the steps as this post is not intended as a tutorial. If there is a need, later on, I can create a tutorial post to make this flower. I promise you, it's very easy!
This pattern is only 6 lines long. We'll take each line (or round) individually.
Instructions:
RD 1: With black yarn: 5 sc in magic circle, ss to
join
You've looked up magic circle & tested it out. Now you're ready to start. Using your black yarn, work a total of 5 single crochets into your magic circle. I recommend using a stitch marker to mark the first single crochet, so you know which stitch to use to join the stitches. Once you have make 5 single crochets, close the circle by slip stitching to the first single crochet. Now tighten the circle by gently pulling on the magic circle tail until there is no hole.
RD 2: sc in each st, ss to join.
Fasten off black & switch to red.
Continuing with your black yarn, you will single crochet in each single crochet you just made. To start, remove the stitch marker and make the first single crochet. You may wish to mark this stitch as, once again, this is the stitch you will use to join the circle.
After you make all your single crochets, you will slip stitch to the first single crochet to join the circle. You can either slip stitch using the black yarn and then join the red yarn in the next round or you can join the red yarn in the last stitch (this is what I do.) To join the red in the last stitch:
Make all 5 single crochets. When you come to your slip stitch, insert your hook into the first single crochet DO NOT PULL THE BLACK YARN THROUGH. Instead, drop the black yarn and pick up the red yarn and pull the RED yarn through to complete your slip stitch. Cut the black yarn leaving a long tail which you will weave in later. Your red is now attached & you can continue to round #3. In Rounds 3 & 4, we're going to use the red yarn to make the foundation for two rows of petals.
RD 3: (*ch2, 1sc in next st*) repeat
around from * to *
To read these instructions you need to know that the information in the parenthesis is meant to be read as a complete set of instructions. Also, when you see an asterisk (*) that means the stitches given between the two asterisk will be repeated. So, for this round using the RED yarn, what we're going to do is chain 2 stitches and then make 1 single crochet in the first single crochet of your circle. This completes the instructions in the parenthesis. You can now move on to the next set of instructions, which tells us to repeat these instructions in the next stitch. So, you will once again chain 2 and make 2 single crochet in the next single crochet in your circle. Complete this process until you've come to the last stitch. Since you're ending with a single crochet, you will single crochet in the stitch where you started the chain 2 process.
RD 4: repeat RD 3 in same stitches. You will have 2 st and 2 ch2 spaces in each sc
– one set in the front &
one in the back.
These instructions are read as: Repeat round #3 using the same technique & stitches. Something that is different for this row is the additional information in italics. You will sometimes see this on instruction sheets if the author feels additional information should be given. In this case, the additional information is to assure the reader that they should be making two stitches in each single crochet, as this is not something that would usually be done.
So, to complete Round 4, you will chain 2 stitches and work 1 single crochet in the next stitch. Repeat this process until you come around and single crochet (you're ending with a single crochet, remember) into the last stitch. You will now have two "rows" of chain 2 spaces. One that sits in the back & one in the front. With Round 5, we will start making petals using the front "row" of chain 2 stitches.
RD 5: ss into closest front ch2 space
(*ch1, 5 hdc, ch1, sc in next ch2 space*) repeat
around from * to *
You should read this line as: slip stitch into the closest (next) chain 2 space (remember, you're working in the front "row" of chain 2 stitches.) After the slip stitch the next cluster (in parenthesis) of stitches is: chain 1, 5 half double crochets (IN THE SAME STITCH AS THE SLIP STITCH,) then chain 1 and single crochet in the next chain 2 space. Repeat this cluster of stitches all the way around the circle. When you get to the last single crochet, we will move to Round #6, where we will create the back row of taller petals.
RD 6: ss into closest back ch2 space
(*sc in next ch2 space, ch4, 5tc, ch4, sc in same
space*) repeat around from *
to *. Fasten off and weave in ends.
This round is, actually, very much like the previous round except we're going to be making more chains and doing a different stitch. You should read these instructions as: slip stitch into the closest (next) chain 2 space in the row behind the row you just worked. After the slip stitch the next cluster (in parenthesis) of stitches is: chain 4, 5 treble crochets (IN THE SAME STITCH AS THE SLIP STITCH,) then chain 4 and single crochet in the next chain 2 space. Repeat this cluster of stitches all the way around the circle. The last single crochet is your ending spot where you can fasten off your yarn and weave in all your ends.
Lastly, these instructions include information on finishing which reads:
Finishing: You can use the flower as is
and sew to a hat, purse or garment. You can
also attach a pin back and use as a
brooch. If you use 100% wool, you can
felt the flower before using. The flower
will shrink about ½ to 1” in size.
The finishing instructions here are very simple. For some patterns, such as purse patterns, garments or afghans, the finishing instructions will tell you how to put your item together. Be sure to read through these instructions before you start to assembly your project.
That's it! I know it seems like a lot, but that's because we went through each line and each stitch. I hope this is helpful in teaching you how to read a pattern.
Lastly, if you ever have trouble with a pattern, there are a number of sources you can try. You can google a stitch, look it up on YouTube, post a question to a forum or contact the pattern author. You can also leave a comment here or email me at cherishables.handcrafts@gmail.com with your question. I don't claim to be an expert, but I can read most patterns and would be happy to help.
Happy Crocheting!!!
Wednesday, February 8, 2012
Seaming
Examples & instructions are given for:
 |
| woven seam |
 |
| whipstitch seam |
 |
| backstitch seam |
 |
| single crochet seam |
 |
| slip stitch seam |
Very informative! What's your favorite way to seam your crochet projects?
Wednesday, February 1, 2012
The Science of Felting
One of the main things I kept hearing (or reading) is that felting is an art, not a science. Sure there is definite science involved. After all, you take 100% wool, agitate it in hot water & you make fabric. It's not magic that felts the item. It's science.
Still, I understood what they were saying. Felting is unpredictable and it will appear differently depending on how much you agitate the yarn, how heavily it is agitated, the composition of the yarn, the temperature of the water, etc. However, after felting well over 100 items, I was feeling confident. After all, I have this down. I knew exactly how long to agitate the item. My results were pretty consistent.
Then I got an order for 30 flower pins. Instead of felting a few at a time, I decided to make the whole batch & felt them all together. Sounds like a good idea, right? I've felted multiple items in one batch before. Usually purses. Which are bigger than flower pins. And, apparently, they don't move around much.
I did everything the same as I always do.
Hot water. Check.
Tiny bit of Ivory detergent. Check.
Half the flowers in one zippered pillow case. Check.
Other half in the other zipper pillow case. Check.
Towel for agitation. Check.
So far so good. The flowers should come out like this:
 |
| Before felting on the left, after on the right. |
Two cycles in the washer later, the flowers were felted all right. They were also very fuzzy! I never saw anything like it. Each flower needed a hair cut.
 |
| This flower looks like it's been camping for 2 weeks. Haircut! Stat! |
 |
| Much better! |
What do you think happened? Too many pins in one pillow case? Just a quirk in the felting process?
I would love to hear if this has ever happened to you and if there is something I can do to avoid this in the future.
Happy Crocheting Everyone!
Sunday, January 22, 2012
D'oh

Inspired by a picture I found online, this is completely my own design. It's my first time creating something from a picture. I'm pleased with how it came out. More importantly, my brother really likes it. :-)
 |
 |
| I even remembered Homer's comb-over. |
 |
| Side view |
Saturday, January 21, 2012
Headbands!
Yeah, I know. Who thinks about headbands? I guess I do, b/c once I got started, I couldn't stop. In fact, I'm still making headbands and I just listed 5 on my Etsy shop.

Here they are, one by one:
 |
| White with shades of blue made with Sheep(ish) wool-blend yarns. |
 |
| Bobble stitch in light gray 100% wool yarn. |
 |
| Pink & light green in a wool-acrylic blend. |
 |
| Almost all the wool-acrylic blend colors I have. :-) |
 |
| X-stitch in woodrose 100% wool yarn. |
I should also point out that the headbands made in 100% wool are all Patons Classic Wool. The wool blend yarns are all Sheep(ish) by Caron. I LOVE the colors in this line. When it first came out, I didn't think I would ever buy it b/c I usually use only natural fibers and wool is my fave. I bought some yarn anyway, b/c I like the colors so much. I'm so glad I did b/c I love this yarn for headbands. It's soft, yet warm and it works up so well. The yarn is such a good quality, you would never guess (by looking) that it's an acrylic blend. Can't recommend Sheep(ish) enough!
I do see myself making more headbands. They're a fun, quick project. But, unless I end up giving headbands to EVERYONE on my list (guys included!) I'd better start making other things. LOL
Thursday, January 5, 2012
New crochet app
What if you don't have a pattern? Or if you want to substitute yarn? Or add a fancy stitch border? It would be great to be able to estimate the yarn you'll need for substitutions, changes and new designs. Apparently, there's an app for that!
 |
| Get it here from iTunes |
This app is available for iPhone and iPad users. It's called Crochet Handy and it is designed to help you determine how much yarn you need for a project. This could be handy if you would like to substitute yarn for a project or if you're designing something new and would like an estimate on how much yarn to buy.
It's available through the iTunes App Store only, so only iPeople can use it. Perhaps a Droid version will come out soon.
Full disclosure -- I haven't purchased the app. While I have an iPhone, it is for work. Since I don't carry it in my non-work life, I didn't take the plunge to purchase the app. In all honesty, it's only $0.99 so I might buy it soon. I will definitely get it if it ever released on Droid. Also, the only review isn't a glowing one but, like most apps, I'm sure it will evolve over time as more data is added and customer feedback is received.
If you are an iPerson, and you fancy an app to help you estimate yarn for a project, hop on over to iTunes for your copy. If you do, please leave a comment letting us know how well the app worked for you.
Subscribe to:
Posts (Atom)